Lost Wax Casting Process
An illustrated guide of one project from start to finish. This shows my "At Last" cuff bracelet as it goes from design to wax sculpture, is prepared for the casting process, cast using the lost wax method, then completed with patina and polish. While this shows one projects step-by-step progression, these steps are taken with all jewelry creations. As with many forms of artwork, for me a sketched layout is the starting point.


The Start of Wax Sculpture on Bracelet Form
For the Pegasus fantasy cuff bracelet I needed to build a form to sculpt it around or the wax would have collapsed as I worked. To start sculpting I lay pink sheet wax over my layout to make sure it's the right size and proportion and transfer the design to the wax, cut it out and add "Perfect Purple" to create the desired depth and detail.

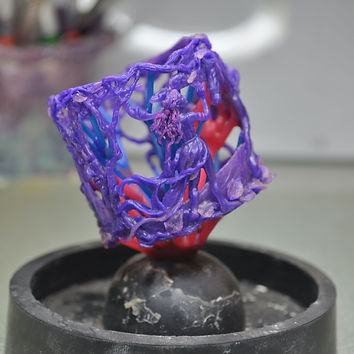
Completed Wax Sculpture of "At Last" Bracelet
This shows the completed wax after it has been removed from the form. The maiden and Pegasus were sculpted primarily separate from the form and then added when they were nearing completion, checking along the way to make sure they fit into their intended space. I work this way so the form doesn't get in the way while working the wax. Other elements like the tree man, castle and faerie house were sculpted in place on the form. For a more detailed look at my wax modeling process for fantasy jewelry see my Wax Modeling Page.
Wax Sculpture Sprued and Ready for Investment
After the sculpture is complete sprues need to be added. Sprues are the pathways needed for the wax to melt out of the mold and more importantly, for the metal to flow in and fill the piece properly.

Sprued Wax Mounted on Rubber Base
The wax model is then mounted on a rubber base and a flask is fitted over it. There are different diameters of bases with flasks matching these diameters and coming in a range of heights. Ideally the model should be about 1/2 inch below the top of the flask and be 1/4 inch from the inside walls.

Weighing Plaster and Ready to Mix Investment
A mixture of plaster and water is made, I use Kerr Satin Cast 20. The amount of plaster and water is determined by the size of the flask. Since my work tends to be quite fine and detailed I adjust the ratio using a little more water than usual.

Invested Flasks Under Vacuum
After the investment is mixed it needs to go under vacuum to remove excess air. After pouring the investment over the wax in the flasks it goes under vacuum for a second time.
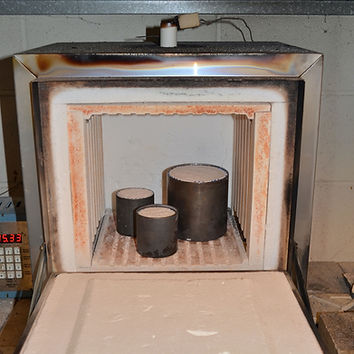
Flasks in Kiln and Ready For Burnout Cycle
The flask(s) are cleaned of any excess plaster, marked to indicate what each contains and are placed in a kiln for a burnout cycle; the one I use is approximately 24 hours. I mix plaster one day and cast the following.

Melting Metal With a Torch
When it is time to cast metal, usually sterling silver, it is put into a crucible and melted with a casting torch. The amount of metal is determined by the finished weight of the wax including sprues and button and multiplied by the specific gravity of the metal to be cast; for silver I multiply the wax weight by 10, for 14k gold it's 13.4.

Pouring Metal Into Flask Aided By Vacuum Assist
The metal is ready to pour when it is a shinny color and moves freely in the crucible when tipped. The flask is taken from the kiln and placed on a casting platform where vacuum is used to pulled the metal into all the voids that were once filled with wax. During the pour heat is continually applied to the metal and then the flask to keep the metal from "freezing" during the pour. After pouring metal it needs to cool for 5-10 minutes depending on the amount of metal.

Quenching Poured Metal After Casting
When the metal has cooled sufficiently it is quenched in a bucket of water. It is very important to wear a respirator or dust mask during this process since free silica is released into the air at this time.The shock of the cool water to the hot metal allows the newly cast metal to be released from the flask.

Picking Out Investment Plaster
Running water and picks, followed by an ultrasound bath, more picks and more ultrasound, are used to remove the plaster from the recently cast piece of jewelry.

Lost Wax Casting Bracelet in Pickle
Silver is oxidized after casting giving it a dark grey color. After all the plaster has been removed the bracelet is placed in the "pickle," a mild acid that removes the oxidation.

Bracelet With Oxidation Removed
The pickle also brings the fine silver to the surface of the metal giving it a white, porcelain appearance.

Removing Sprues With Jewelers Hand Saw
A hand saw is used to remove the sprues. It is important to cut close to the bracelet, but not into the piece

Bracelet With Sprues Removed
This photo shows the bracelet along with the removed sprues, it's not unusual for me to remove half the casting weight in sprues.

Bracelet With Flexi Shaft and Accessories
A flexi shaft (similar to a dremel only with more control and horsepower) is used for finishing. First a series of grinders are used to smooth down the rough ends where sprues were attached and sometimes to smooth out imperfections. Followed by a minimum of 6 levels of polishing.

Finished "At Last" Pegasus and Maiden Fantasy Bracelet
After the patina is applied I continue with polishing. Some areas I bring to a brighter shine removing most of the patina while others I leave darker to provide contrast and enhance the detail of my work. This is followed by a light coat of Renaissance Wax to protect the finish. The finished piece of -fantasy jewelryin the form of a cuff bracelet that tells the story of a meeting between Pegasus and a maiden.